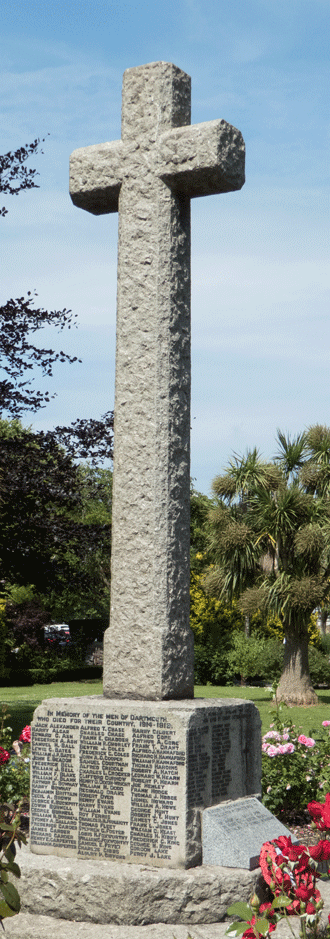
The Battle of Jutland
Twelve men commemorated in Dartmouth lost their lives at the Battle of Jutland on 31st May 1916. A thirteenth died on 1st June, of wounds sustained in the action.
The battle is controversial - who won? - if not the British, why not? - why was the cost so great? - could mistakes have been avoided? - who made the worst mistakes? and so on. Many books and websites consider these issues, and we do not attempt to add to them. The focus of this article is on the ships in which the men on our database died, including an account of their service leading up to the battle, and a brief account of their role in the battle itself.
The men who died were in four ships. In order of age of construction, they were:
- HMS Defence (4)
- HMS Indefatigable (7)
- HMS Queen Mary (1)
- HMS Barham (1)
HMS Defence
HMS Defence was a Minotaur-class armoured cruiser, ordered as part of the 1904-5 naval construction programme. The armoured cruiser was a type of warship designed to operate independently and long-range, capable of defeating any ship apart from a battleship, but fast enough to outrun a battleship. Essentially the various designs prioritised speed over armament, whilst providing the same or similar level of armour protection as contemporary battleships. Because cruisers were (relatively) fast but lightly armed, their roles were reconnaissance, commerce protection, and pursuit.
The Minotaur class represented the end of the development of this type of capital ship, being replaced by the Invincible class battlecruiser. The battlecruiser presented a different trade-off between speed, armament, and protection. They were similar in size and armament to a battleship. However, as they were not originally intended to encounter accurate heavy shellfire, the tonnage which would otherwise be taken up by armour protection could be used for more propulsive machinery, so as to achieve greater speed.
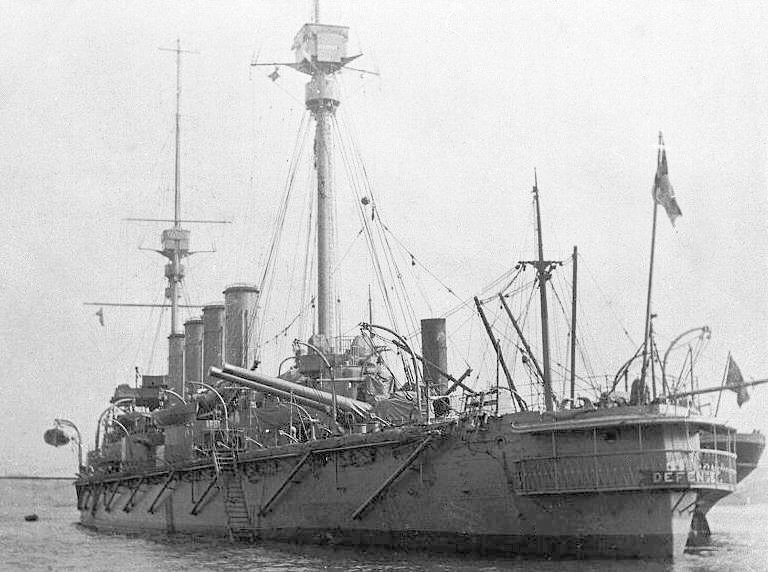
HMS Defence was constructed in Pembroke Dockyard, being laid down on 22nd February 1905, launched on 24th April 1907, and completed in November 1908. She commissioned at Devonport on 9th February 1909 for service in the Fifth Cruiser Squadron of the Home Fleet, based at the Nore, but three months later was reassigned to the First Cruiser Squadron. In 1910 she was part of the escort for the Duke of Connaught's trip to South Africa; but after this, there were reportedly problems of discontent. The Nottingham Evening Post reported on 22nd March 1911 that:
The Defence, which is the very lastest pre-dreadnought cruiser, returned to Devonport last month ... she was recommissioned by Captain H H Bruce "for a further term of service in the First Cruiser Squadron". Her complement was made up as follows: 275 ratings forming the nucleus crew of the Sutlej; 162 ratings drawn from the Devonport Naval Barracks; 15 ratings from the torpedo ship Defiance; 20 ratings from the mechanicians' ship Indus; 7 ratings from the training ship Impregnable; and 34 ratings from various ships in harbour. With this complement of 513 the Defence went into commission as an "instantly ready" ship of our premier cruiser squadron. Her proper complement is 755 of all ranks ... This means that two men have to do the work of three. There are not sufficient men to furnish three engine-room and stoker watches, so that instead of the usual practice of one watch on and two watches off, these ratings in the Defence have to work watch-and-watch. Such a condition of things is producing its inevitable result. The weekend batch of liberty men invariably return four or five short, and in view of these desertions the captain has threatened to stop leave altogether. It is openly stated in the lower deck that if this is done mutiny will follow.
Apparently this state of affairs was either managed or improved, because no further problems were reported. In 1911-12 HMS Defence escorted King George V and Queen Mary on their state visit to India for the Delhi Durbar. She was then transferred to the China Station - originally it had been intended that HMS New Zealand would fill that role on completion. In December 1912, she was ordered to rejoin the 1st Cruiser Squadron in the Mediterranean as flagship and appeared thus in the 1913 Navy List.
James Carroll and Walter McLean joined her on 2nd September 1913, and James' brother William Carroll the following day.
As the threat of war grew imminent, the First Cruiser Squadron was on station in the Mediterranean, together with the 2nd Battlecruiser Squadron, consisting of Inflexible, Indomitable and Indefatigable (see below). In support were four light cruisers and a flotilla of sixteen destroyers. The fleet was commanded by Admiral Berkeley Milne, with his deputy, Rear Admiral Troubridge, commanding the First Cruiser Squadron.
Also in the Mediterranean were the German battlecruiser Goeben and light cruiser Breslau. On 2nd August 1914, although Britain and Germany were not yet at war, the Mediterranean fleet was instructed by the Admiralty to shadow Goeben and also to keep watch on the Adriatic. When Germany and France declared war, Goeben and Breslau headed immediately for North Africa to attack French transport ships bringing troops from North Africa to France.
Fearing that Goeben and Breslau might escape to the Atlantic via Gibraltar, the Admiralty ordered Indomitable and Indefatigable to be sent west towards Gibraltar. In the meantime, Goeben and Breslau had been ordered to head for Constantinople. At 0930 on 4th August the ships passed each other, but took no action, since Britain and Germany were not yet at war. Indefatigable and Indomitable turned to shadow the German ships, but, due to problems with their boilers, were not able to keep up, and so lost contact.
Goeben and Breslau made for Messina to recoal. By this time Britain and Germany had declared war, but Italy was still neutral. The Mediterranean Fleet was therefore ordered to stay outside the Straits of Messina and intercept the German ships when they eventually left. Indefatigable and Indomitable were ordered to remain in the west. The First Cruiser Squadron was kept in the Adriatic.
Goeben and Breslau went east. When they left Messina for the Aegean, Rear Admiral Troubridge took the First Cruiser Squadron to intercept them. However, Troubridge had been instructed by Milne (following his own somewhat unclear instructions from the Admiralty) "not to get engaged with superior forces". Goeben had more powerful guns, better armour, and superior speed (notwithstanding problems with her boilers), though Troubridge had larger forces in total, including eight torpedo-armed destroyers. Troubridge judged that he would be unable to intercept Goeben and Breslau before full daylight, and that a full daylight encounter would put him at too great a disadvantage. He therefore broke off the chase. Goeben and Breslau were able to enter the Dardanelles and reach Constantinople, where (to overcome the difficulty that the Ottoman Empire was still neutral) they transferred into the Ottoman Navy.
HMS Defence then remained part of the blockade of the Dardanelles to prevent Goeben and Breslau re-entering the Mediterranean, until she was ordered to the South Atlantic to assist Rear Admiral Cradock in the pursuit of Scharnhorst and Gneisenau, rumoured to be somewhere in the southern hemisphere. A few days later the order was countermanded, but was reinstated when the Admiralty received certain news of the appearance of Scharnhorst and Gneisenau off the coast of Chile. HMS Defence was ordered to Montevideo to add to the forces available in the South Atlantic.
The following day, when news reached the Admiralty of the disaster at the Battle of Coronel, Invincible and Inflexible were also ordered to the South Atlantic. This released HMS Defence to reinforce the Cape station in South Africa, where additional forces were required in the campaign against German West South Africa (see also our general articles on the Battle of Coronel and the Battle of the Falkland Islands).
On her return from South Africa, HMS Defence rejoined the 1st Cruiser Squadron. The Squadron was transferred to the Grand Fleet in January 1915, under a new Rear Admiral, Sir Robert Arbuthnot. George Light joined her there on 19th October 1915.
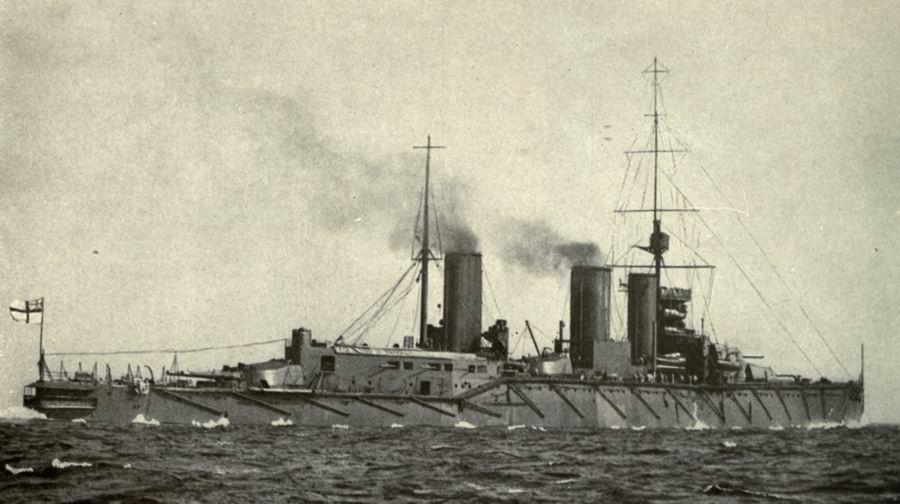
HMS Indefatigable
During 1908 there had been fierce controversy over the future capital ship programme. The new Liberal Government, led by Herbert Asquith, which had taken power in January 1906, wanted reductions in naval spending. But there was a public outcry about producing only two new ships when German plans showed considerably more. Jane's Fighting Ships declared that: "Either we have to be absolutely supreme at sea or not: there is no middle way".
The 1908 Estimates provided for one battleship and one battlecruiser, which was to follow closely the design of the Invincible class. However, the Dominion Governments of both Australia and New Zealand offered funding for two additional capital ships. New Zealand's offer was an outright gift; the Australians wanted their ship to join the Royal Australian Navy and to be "on offer" to the Royal Navy if needed. The new battlecruiser Indefatigable was thus joined by two sisters, HMS New Zealand and HMAS Australia.
Indefatigable was a clear illustration of Admiral Jacky Fisher's concept that "speed is armour". She was heavily armed and enabled to reach high speeds - if forced, Indefatigable could achieve nearly 27 knots - but her armour protection levels were reduced in consequence (though better than the Invincible class). As the number of battlecruisers grew into squadrons, their operational role shifted to become the fast wing of the battlefleet, but their potential vulnerability to heavy shellfire was lost sight of. German battlecruisers, by contrast, were better armoured than their British counterparts, not least because the German Navy took into account that they might have to encounter an enemy superior in numbers.
.jpg)
Indefatigable was constructed at Devonport Dockyard. She was laid down on 23rd February 1909, launched on 28th October 1909, and commissioned on 24th February 1911 for service with the 1st Cruiser Squadron in the Home Fleet.
Frederick Stumbles was the first of the men commemorated in Dartmouth to join her, on 1st March 1912.
On 1st January 1913, the 1st Cruiser Squadron, consisting of Lion, Princess Royal, Indefatigable, Indomitable and Invincible, became the 1st Battle Cruiser Squadron.
Five of the men commemorated in Dartmouth joined Indefatigable between February and June 1913:
- Richard Todd, 1st February
- Charles Gibbs, 8th March
- William Rowe, 14th June
- John Walmsley and Frederick Brewster, 17th June.
In December 1913, Indefatigable transferred to the Mediterranean to join the 2nd Battlecruiser Squadron. Inflexible, Indomitable and Invincible had already transferred there.
Frederick Ash joined the ship on 23rd June 1914.
In August 1914, as mentioned above, the 2nd Battlecruiser Squadron was still in the Mediterranean. After the encounter with Goeben and Breslau, described above, Indefatigable and Indomitable were assigned to the Dardanelles Squadron to ensure that Goeben and Breslau did not re-enter the Mediterranean. As a result, on 3rd November 1914, after the Ottoman Empire had declared war against Russia, they were involved in the first attack on the Dardanelles to test the Ottoman fortifications (see our Gallipoli timeline).
However, on 24th January 1915 Indefatigable was relieved by Inflexible, and went to Malta for a refit. She did not return to the Dardanelles, but left Malta for Britain and the Grand Fleet on 14th February 1915.
The Grand Fleet was based in Orkney in the great natural harbour of Scapa Flow. But from there it could not hope to intercept or deter "hit and run" raids on the east coast of England. After the bombardment of Scarborough, Whitby and Hartlepool in December 1914, it was agreed that a higher level of protection was necessary. On 20th February 1915, the battlecruisers were thus brought together into the "Battlecruiser Fleet", based on the new dockyard of Rosyth in the Firth of Forth, led by Vice Admiral Sir David Beatty in HMS Lion.
Indefatigable joined the 2nd Battlecruiser Squadron, with her sisters Australia and New Zealand. From February 1915 she conducted uneventful patrols of the North Sea. From April to May of 1916, she was temporary flagship of the 2nd Battlecruiser Squadron, after HMAS Australia collided with HMS New Zealand in fog. New Zealand was repaired in Rosyth but Australia had to go down to Devonport, and so was absent for several weeks.
HMS Queen Mary
HMS Queen Mary was ordered as part of the 1910 programme of warship construction, which provided for four battleships and one battlecruiser. She was the last battlecruiser completed before the war, and was very similar to HMS Lion and HMS Princess Royal, laid down ten months earlier, though slightly larger. The design of the Lion class was a further development of the Indefatigable, being faster, larger and more powerfully armed, though still with lower protection levels than a battleship.
HMS Queen Mary was laid down at Palmers Shipbuilding and Iron Company, Jarrow, on 6th March 1911. She was launched on 20th March 1912 and completed for trials in May 1913, being handed over in August. She was commissioned into the 1st Battlecruiser Squadron under Rear Admiral David Beatty on 1st September 1913. Albert William Privett joined her three days later. In February 1914, the squadron visited Brest and in June they visited Russia.
On the outbreak of war the Grand Fleet, including the 1st Battlecruiser Squadron, was deployed to Scapa Flow. On 28th August the Squadron was sent to support the raid on German forces in the Heligoland Bight by destroyers from Harwich, under Commodore Reginald Tyrwhitt, and submarines under Commodore Roger Keyes. The early parts of the action were confused and British ships were getting the worst of the engagement until the battlecruisers arrived and were able to intervene. As there were no comparable warships amongst the opposing forces, the battlecruisers' heavy armament was decisive.
HMS Queen Mary did not take part in the Battle of the Dogger Bank in January 1915 because she was in refit in Portsmouth. (For an account of that action, see the story of Charles Gerald Taylor).
HMS Barham
HMS Barham was ordered as part of the 1912 programme of warship construction. In the words of RA Burt:
Great importance had long been attached to the ability to bring a superior concentration of fire against the head of an enemy's battle line .... The Royal Navy had assigned this role to the large cruisers and battlecruisers though it was appreciated that because of their inferior protection they would not be expected to engage the enemy's battleships successfully. What was required was a group of fast, well-protected battleships that could forcefully press home an attack on any type of ship ... It was proposed that an appropriate design be formulated for the 1912 programme ... As the new ships were intended to form a fast battleship squadron, capable of operating around and against the head of an enemy line, they would have to embody maximum offensive power, adequate protection and a designed speed of at least two or three knots faster than any other battleship extant.
The five "super dreadnoughts" of the Queen Elizabeth class, which included HMS Barham, were the result. The aim was that they should have neither the slowness of battleships nor the inferior protection of battlecruisers. They were the first battleships to be armed with 15-inch guns and to be all-oil fuelled, and their target maximum speed was designed as 25 knots.
These new ships were originally intended to take over the battlecruiser role as the fast division of the battlefleet - the battlecruiser squadron was intended to have been disbanded in May 1915, and distributed in pairs to squadrons of modern light cruisers. But war intervened. As described above, far from being disbanded, the battlecruisers became, in effect "a fleet within a fleet".
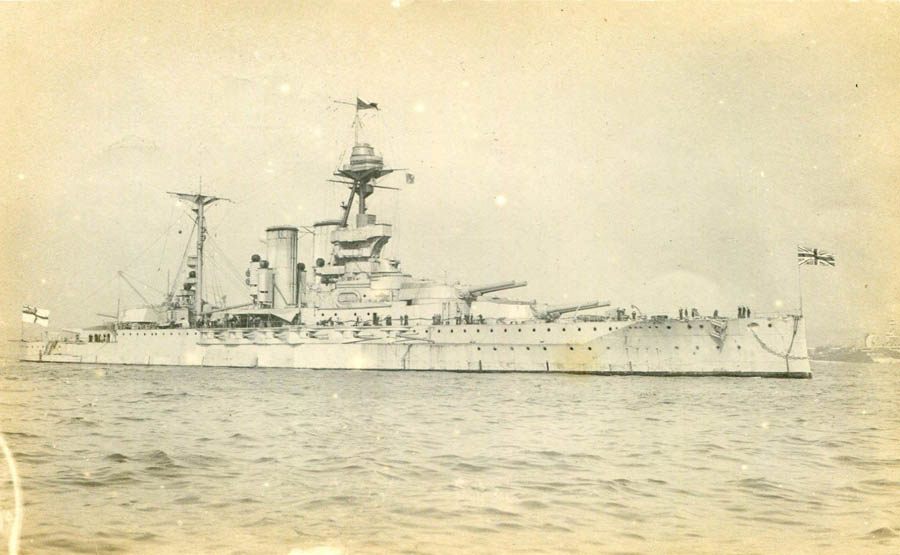
HMS Barham was constructed by John Brown & Company and laid down at their Clydebank shipyard on 24th February 1913 and launched after the outbreak of war, on 31st December 1914. She was commissioned on 19th August 1915 and joined the Grand Fleet on 2nd October 1915. Henry Dixon-Wright joined her at about this time.
The 5th Battle Squadron of the Grand Fleet was constituted in November 1915 and was commanded by Rear Admiral Hugh Evan-Thomas in HMS Barham. Queen Elizabeth and Warspite were already with the Grand Fleet, Valiant and Malaya joined in February and April 1916. The squadron was one of the most powerful battleship squadron the world had ever seen.
On 3rd December 1915, Barham was accidentally rammed by her sister ship Warspite, requiring a period in repair. She rejoined the Grand Fleet on 1st January 1916.
At this point several issues came to bear on the deployment of the 5th Battle Squadron:
- fears about the growing strength of the German 1st Scouting Group, under Admiral Hipper
- concerns about gunnery inefficiency in the Battlecruiser Fleet, owing to the lack of U-boat secure facilities for full calibre gunnery practice in the Firth of Forth
- continuing pressure to redistribute the Grand Fleet in response to German coastal raids, in particular that on Lowestoft and Great Yarmouth on 24th April
On 12th May 1916, the First Sea Lord, Sir Henry Jackson, met Admiral Jellicoe and Admiral Beatty at Rosyth. In response to the pressure to prevent further east coast raids, it was decided to develop the Firth of Forth as an alternative base for the Grand Fleet. Action would also be taken to improve Battlecruiser Fleet gunnery practice and a start would be made with the 3rd Battlecruiser Squadron, consisting of Invincible, Indomitable and Inflexible, which would move to Scapa Flow for ten days. In their absence, and with HMAS Australia out of action in repair in Devonport (see above), the 5th Battle Squadron was temporarily allocated to the Battlecruiser Fleet. On Friday 2nd June, a Grand Fleet concentration would take place off the Skagerrak, in the hope of drawing out the German High Seas Fleet. At that rendezvous, the two squadrons would once again change places.
The 5th Battle Squadron, headed by HMS Barham, arrived in the Firth of Forth on 22nd May 1916, and that afternoon the 3rd Battlecruiser Squadron proceeded north to Scapa.
The Battle
In the meantime, Admiral Scheer was planning an operation designed to entrap part of the British fleet, whilst not endangering the High Seas Fleet as a whole. A new bombardment of the east coast, this time Sunderland, would attempt to draw the battlecruiser fleet into a High Seas Fleet trap in the Dogger Bank area, whilst Zeppelins would keep watch to give warning of the Grand Fleet. The plan was scheduled originally for 17th May, but postponed to 23rd and then 29th, whilst U-boats laid mines and were positioned for ambush. Finally, due to bad weather, it was abandoned altogether, and instead the plan was changed to a sortie northwards up the Danish coast towards the Skagerrak, on the last day before the U-boats would need to be withdrawn, given their endurance limits.
On the morning of 30th May, Room 40 in the Admiralty deduced from decoded German signals that a major fleet operation was about to take place northwards.
Exactly where they were making for was not known but a rendezvous position was agreed off the Skaggerak and Admiral Jellicoe ordered the entire Grand Fleet to sea. By 10.30 pm all units were at sea; the expectation was that the Battlecruiser Fleet (with the 5th Battle Squadron) would join with the rest of the Grand Fleet some time early the following afternoon.
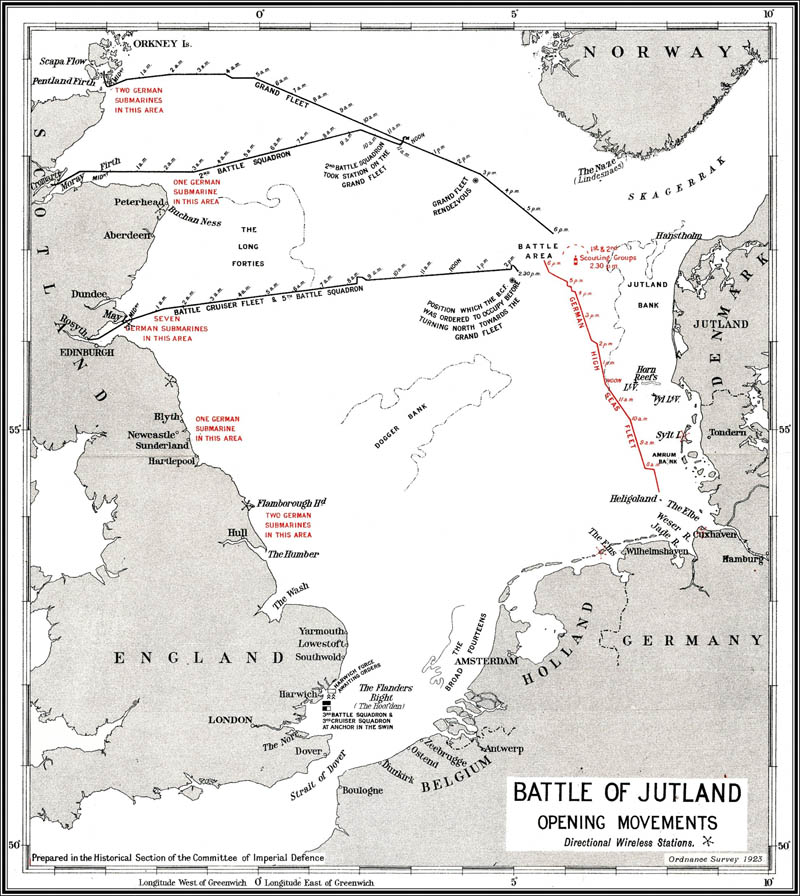
To make the rendezvous, Admiral Beatty, proceeding eastwards from the Firth of Forth, required to turn north. The Battlecruiser Squadrons were in front (with light cruiser squadrons in reconnaissance ahead) and the 5th Battle Squadron behind. At 1.30pm Beatty repositioned his force slightly to facilitate the forthcoming rendezvous.
At 2.20pm the light cruiser HMS Galatea sighted the enemy and in response Admiral Beatty signalled his force to turn south south east. Barham saw the signal but was unable to read it because of the distance from the flagship, and the signal was not relayed to her by searchlight. Barham interpreted it as a signal to resume zigzagging (which had lapsed during the turn to the north) and (in one of many Jutland controversies) continued on this course for some time before turning to catch up. 5th Battle Squadron, already well astern of the rest of Admiral Beatty's fleet, thus dropped further behind.
The Run to the South
At 3.20pm the two battlecruiser fleets, under Admiral Beatty and Admiral Hipper, sighted each other. Admiral Hipper turned back southwards, to bring the British battlecruiser fleet within range of the main part of the High Seas Fleet. Admiral Beatty headed south, to cut him off.
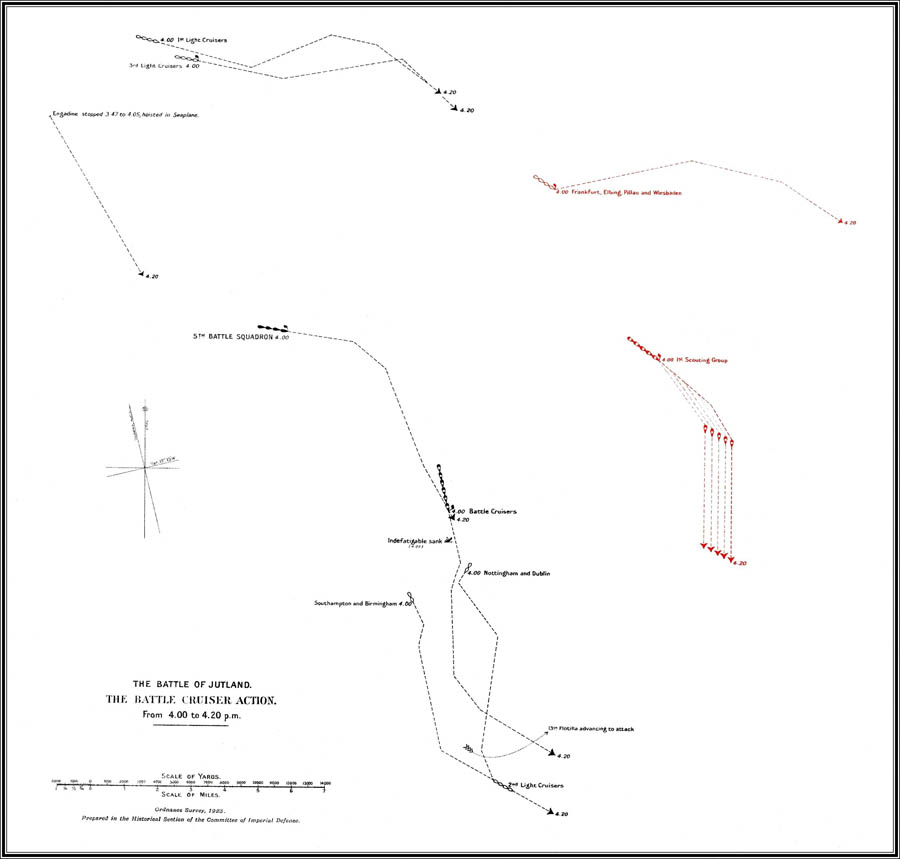
The two opposing lines of battlecruisers opened fire at about 3.45pm. Lion, Princess Royal, Queen Mary, Tiger, New Zealand and Indefatigable engaged Lutzow (Admiral Hipper's flagship), Derfflinger, Seydlitz, Moltke and von der Tann.
Although there were six British ships engaging five, two mistakes were made. Admiral Beatty ordered the Princess Royal to concentrate with him on the Lutzow, in which Admiral Hipper was leading. But the Queen Mary took not Derfflinger, next in line, but Seydlitz. Derfflinger was left unopposed for nearly ten minutes. In the meantime, Tiger and New Zealand were both focussed on Moltke, leaving Indefatigable against Von der Tann.
In the meantime, the 5th Battle Squadron, under Admiral Evan Thomas, was over seven miles away, out of the action, though doing their best to catch up.
At 3.58pm Lion was badly hit, on "Q" turret amidships. The fire then spread and ignited cordite charges. But the magazine doors had been closed (the order was given by both Major Harvey, the officer in charge of the turret, though mortally wounded, and by the Captain, Alfred Ernle Chatfield) and the magazine was flooded, preventing the ship from blowing up.
At 4.00pm Indefatigable, in the rear of the battlecruiser line, was hit on her forecastle and she sheered out of line. A second hit almost immediately afterwards was followed by a huge explosion and she sank at 4.05pm. Exactly what happened is unclear. On HMS Malaya, Sub Lt Clifford Caslon described what he saw:
I thought for an instant that the last ship in the line had fired all her guns at once, as there was a much bigger flame, but the flame grew and grew till it was about three hundred feet high, and the whole ship was hidden in a dense cloud of yellow brown smoke. This cloud hung in the air for some minutes, and when it finally dispersed there was no sign of the ship.... I had a feeling at the time that it was Indefatigable in which I had a very great friend, and I learnt afterwards that it was so.
There were two (or possibly three) survivors.
At this point the 5th Battle Squadron finally came into range of the rearmost German battlecruisers, but too late to save the Indefatigable (one of many Jutland "might have beens"). Barham and Valiant fired at Moltke and Warspite and Malaya the Von der Tann, and began to cause serious damage.
In the meantime the battlecruiser duel continued. At about 4.20pm, due to an error, Lion fell slightly out of line. Derfflinger inadvertently switched fire not to Princess Royal but to Queen Mary, which thus came under fire from Derfflinger as well as Seydlitz, her immediate opposite. Queen Mary switched fire to Derfflinger but at 4.26pm she was hit on her forward deck by three shells, followed by two more. Her magazines detonated and she blew up. On HMS Tiger, just behind, Lt Cdr Edward Roynon Jones described the scene:
My impression at the time was that a full salvo fell on her centre turret which blew up and this detonated every other explosive in the ship. There were definitely two explosions with only a fraction of a second between them but the second one with its flame and smoke was much greater than the first ... The two explosions blended into one in less than no time ... an enormous height of dull red flame [was] followed by a great mass of black smoke amongst which was wreckage thrown in all directions. The blast was tremendous.
The Official History records that
as the Tiger and New Zealand raced by her to port and starboard, her propellers were still slowly revolving high in the air. In another moment, as her two consorts were smothered in a shower of black debris, there was nothing of her left but a dark pillar of smoke rising stemlike till it spread hundreds of feet high in the likeness of a vast palm tree.
Survivor accounts indicate that though many men had survived the explosion, many were wounded and many did not survive in the water. Destroyers were engaged in the fight and did not stop to pick up survivors. Admiral Beatty had ordered his destroyers to launch a torpedo attack, to which Admiral Hipper responded.
In a confused fight, two German destroyers were sunk; two British destroyers were also hit, and sank later - HSM Nestor and HMS Nomad. The destroyer Petard was successful in firing a torpedo which caused severe damage to the Seydlitz, though she did not sink. Von der Tann was also badly damaged but able to maintain her place in line.
At 4.33pm the German High Seas Fleet was sighted, heading in support of the German battlecruisers. Beatty ordered a turn to the north to fall back on the Grand Fleet, but (once again, in another Jutland controversy) the 5th Battle Squadron did not turn for vital minutes, bringing them within range of the High Seas Fleet. As they turned in line, they were engaged by both the High Seas Fleet and Admiral Hipper's battlecruisers. Barham was hit by a heavy shell which caused many casualties. Valiant and Warspite were fortunate but Malaya was also hit, though she broke formation and turned early.
The opening phase of the Battle of Jutland had been, in the words of one commentator, an unmitigated disaster for the Battlecruiser Fleet. But even these very serious losses were not enough to tip the overall naval balance of power.
The Run to the North
At 4.52pm Admiral Hipper carried out his own turn and began to steer north, head of Admiral Scheer. He resumed fire against the four British battlecruisers, whilst Von der Tann, though severely battered, aimed at HMS Malaya, of the 5th Battle Squadron.
Admiral Beatty's aim at this stage was to draw the German Fleet towards the Grand Fleet, so he opened out the range. The 5th Battle Squadron, in the meantime, engaged both the German battlecruisers and the leading ships of the High Seas Fleet. Though all four superdreadnoughts sustained considerable damage, with many men killed or wounded, they survived and scored repeated hits on their opponents. The Run to the North, as this phase of the battle has come to be known, did not yield further success (from the German point of view) or disaster (from the British). By 5.30pm the first phase of the battle had ended, with the British Battlecruiser Fleet heading north as fast as possible and the German Fleet following.
The Fleets in Contact
At 17.33pm the screens of the Battlecruiser Fleet and the Grand Fleet made first contact as HMS Falmouth, one of Admiral Beatty's light cruisers, sighted HMS Black Prince, the extreme starboard wing ship of Admiral Jellicoe's cruiser screen. As Admiral Beatty approached, he adjusted his course to north north east, screening the Grand Fleet from view but at the same time closing the range once again with Admiral Hipper's battlecruisers. Firing broke out once again at 5.40pm as the British Battlecruiser Fleet and the leading two ships of the 5th Battle Squadron concentrated their fire on Admiral Hipper's ships, particularly his own flagship, the Lutzow.
The main fleets continued to close on each other though neither had any clear idea of the whereabouts of his enemy. Admiral Jellicoe at this point had very little information about the direction from which the enemy fleet would appear. Signals from Admiral Beatty had been few and when they came were confusing. At 6.01pm Jellicoe signalled to Beatty: "Where is the enemy's battle fleet?" But Beatty replied giving the position of the enemy's battlecruisers, since even he himself did not know exactly where the enemy fleet was.
The Battlecruiser Fleet was by now in visual touch with the Grand Fleet drawing across the front and at 6.14pm Admiral Jellicoe finally was given the information that the High Seas Fleet was on a bearing south-south-east. The long expected encounter was taking place at rather closer range than had been planned. At 6.16pm, Admiral Jellicoe ordered the Grand Fleet to "form line of battle on the port wing column, on a course southeast by east".
Whilst all this was going on, the 1st Cruiser Squadron, with Rear Admiral Arbuthnot flying his flag in HMS Defence, found themselves between the Grand Fleet and the High Seas Fleet. Apparently intending to finish the German light cruiser Wiesbaden, which had been hit earlier, Admiral Arbuthnot turned south, almost causing a collision with Admiral Beatty in Lion, moving towards the Grand Fleet. This brought Admiral Arbuthnot's squadron well within range of Admiral Hipper's battlecruisers, and both HMS Defence and HMS Warrior came under heavy fire. At 6.20pm HMS Defence was hit by two heavy salvoes in quick succession and blew up.
They were steaming at their utmost speed between the lines, endeavouring to get clear round us... being continually straddled and frequently hit. They were soon on fire in several places, especially the Defence, but still they continued to fire to the very last. The Defence suddenly disappeared in an immense column of smoke and flame, hundreds of feet high. It appeared to be instantaneous destruction, the ship seeming to be dismembered at once. Wreckage continued to fall into the water for quite a considerable time after the explosion, but when the smoke cleared, there was absolutely nothing to be seen...
Warrior was not sunk (at this stage) but was badly damaged. She was saved by extraordinary circumstances in which HMS Warspite's steering jammed, making her turn in circles. German fire turned from Warrior to Warspite, but although she received multiple hits, she had survived, with relatively few casualties. When control was finally regained, she was ordered back to Rosyth.
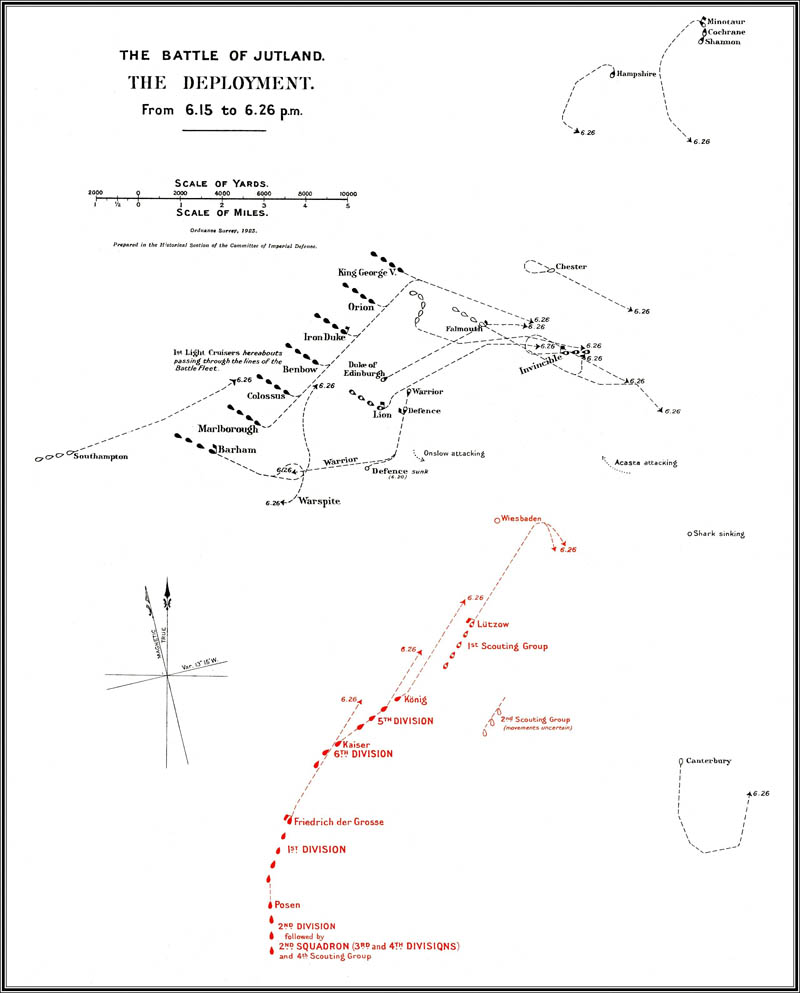
As the Grand Fleet deployed, the 3rd Battle Squadron, consisting of the Invincible, Inflexible and Indomitable, moved into station ahead and engaged Admiral Hipper's battlecruisers. Invincible hit Derfflinger several times but a hit on "Q" turret caused an explosion and she blew up, sinking at 6.33pm. In the words of Leading Seaman Reginald Bowden, HMS Yarmouth:
Suddenly a dark smudge seemed to pass along the leading ship's side, the Invincible. Then she disappeared into a hugh cloud of smoke and flame. The uper bridge awning was blown high above the smoke and looked like a huge parachute with the iron stanchions that supported it dangling below it. As soon as the force of the explosion was over the whole thing plunged into the sea. It was awful, that a ship could go in seconds like that, not so much the ship but those living souls with her.
Her bow and stern remained standing on the seabed for some time, protruding from the water. The small number of survivors were picked up by the destroyer HMS Badger.
The Main Action
But as a result of Jellicoe's deployment the British line was broadside on, able to bring every gun to bear on the German ships as they came into range. The battlecruisers in particular were badly damaged, as were the four ships of the leading battleship squadron.
After only a very short time, Admiral Scheer decided to withdraw. At 6.33pm he ordered a manoevre called the "Battle turnaway" (Gefechtskehrtwendung) in which each ship turned in a half circle to form single line ahead in the opposite direction. The turn to the west was covered with a torpedo attack and smoke. In a very short time his fleet was out of sight.
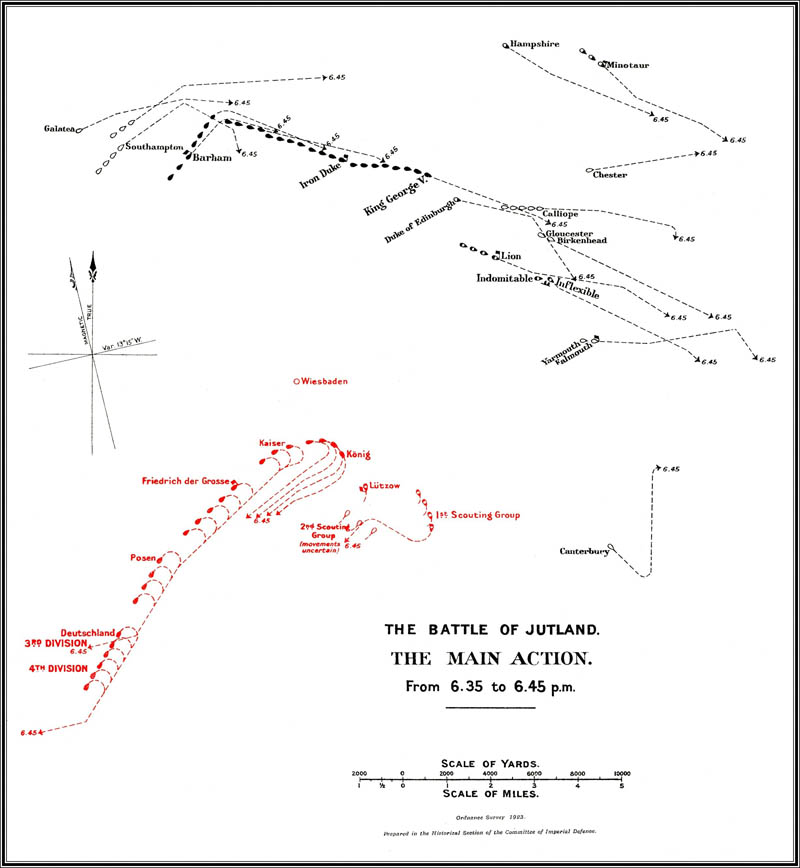
In response, at 6.44pm Jellicoe turned by divisions to the south, to be in the best position to cut off a German retreat.
At 7.04pm, Admiral Scheer turned again, once again heading east, apparently to create a surprise attack. But he found himself under fire first from the rear of the Grand Fleet and then from the entire battle line. At 7.12pm he turned a third time, and at the same time ordered his battlecruisers forward to cover the withdrawal. All the battlecruisers were already badly damaged and came under very heavy fire. The turnaway was also covered by a torpedo attack and smoke screen.
At 7.53pm Admiral Scheer turned south. His advance squadrons were met by Admiral Beatty, ahead of the Grand Fleet, causing more severe damage, but as the light faded rapidly they were unable to respond. Scheer turned away one final time to attempt to make it home.The Night Action
Neither side wanted to fight at night, though of course they did not know each other's views at the time. Admiral Jellicoe ordered the fleet to assume night cruising order, with the aim of keeping between Admiral Scheer and his return to base, and of resuming action at first light.
The two fleets were now both steering south-south-east on gradually converging courses, but because the German fleet cruised at a slower speed than the British fleet, it was able to pass astern of the main battle squadrons.
However, during the night there were a series of short actions between destroyers and cruisers and battlecruisers and battleships. HMS Black Prince, originally part of the 1st Cruiser Squadron, had become detached, and while attempting to find the British fleet, met a line of German battleships and was sunk at point blank range at 00.10am. The British destroyer Tipperary similarly met a light cruiser and two battleships, and was sunk. But British destroyers also sank a pre-dreadnought battleship, three light cruisers and two destroyers. Admiral Hipper's battlecruiser Lutzow had been abandoned and had finally sunk. Destroyer attacks also caused the battleship Posen to ram and sink the light cruiser Elbing.
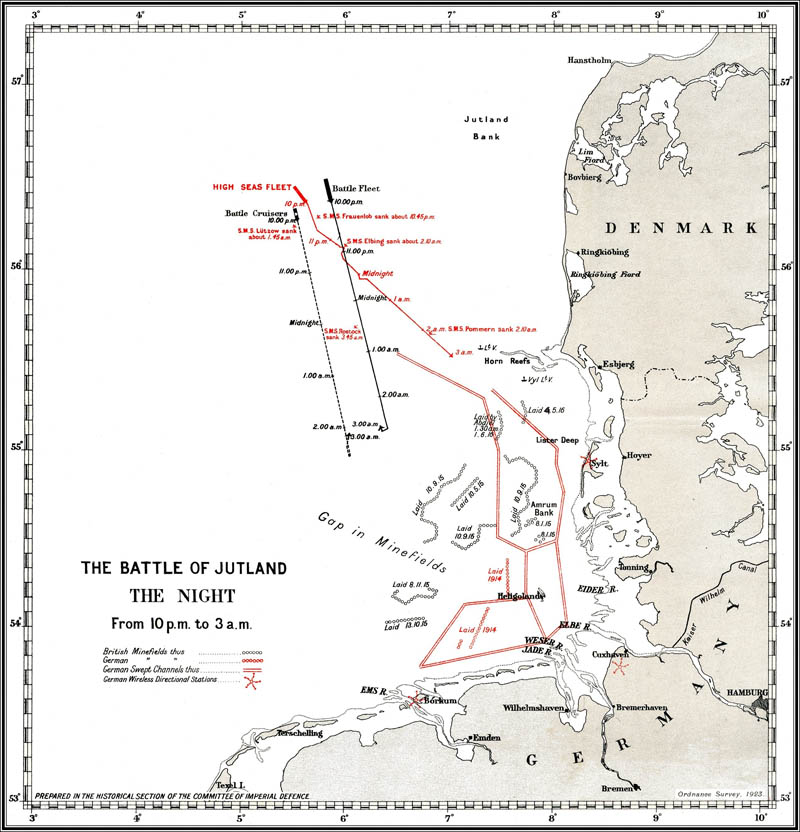
As dawn broke on 1st June, Admiral Jellicoe searched for the High Seas Fleet until at 3.55am he received a signal from the Admiralty informing him that it was on course to return home. He had no alternative but to do likewise. The opportunity for another Trafalgar had been missed.
The losses
The losses were severe - and were a shock:
Total British casualties were 6094 killed; 674 wounded; 177 prisoners of war. Total German casualties were 2551 killed; 507 wounded.
British ships lost were:
- Battlecruisers: Indefatigable; Invincible; Queen Mary
- Armoured Cruisers: Black Prince; Defence; Warrior
- Destroyers: Ardent, Fortune, Nestor, Nomad, Shark, Sparrowhawk, Tipperary, Turbulent.
German ships lost were:
- Battlecruiser: Lutzow
- Light Cruisers: Elbing, Frauenlob, Rostock, Wiesbaden
- Destroyers: S35; V4; V27; V29; V48
However, British numerical superiority told in the long term. The Grand Fleet was ready for action by 21.45pm on 2nd June, with twenty-four intact dreadnoughts and battle cruisers. The High Seas Fleet had only ten. German naval strategy turned to other options, and resumed unrestricted submarine warfare.
The News Reaches Dartmouth
Although the Admiralty released an initial announcement very soon after the battle, and the national press carried fairly full reports of British losses on Saturday 3rd June, these details came too late to be included in the edition of the Dartmouth Chronicle immediately following the battle. By the following week, families had been notified of casualties and the scale of the losses, as they affected Dartmouth, was clear. Several announcements of the deaths of loved ones were placed in the paper, and several more the following week.
At the monthly meeting of Dartmouth Town Council the following Monday, a vote of condolence was moved for the families affected. The Mayor, Thomas Wilton, expressed himself in suitably patriotic but also sombre terms:
As Mayor of the town I feel it my duty before commencing the business of this meetings, to refer to the great sea fight which has recently taken place in the North Sea between the British and German Fleets, in which our seamen by their heroic deeds have covered themselves in glory, and valiantly upheld the great traditions of past years of the British Navy.
It is not customary for a fleet which is compelled to seek safety by retiring behind minefields to their harbours, to announce a victory as the Germans have done in this case, but during this war they have proved their ability, by lying of the first order, to proclaim to the world "victories" which in reality are, as in this case, defeats.
With so many of Dartmouth's sons and residents in the British Navy it unfortunately follows that many wives and families have to mourn the loss of dear ones from amongst us. I therefore beg to move a vote of condolence and heartfelt sympathy with the families of those Dartmouth Citizens who have given their lives in this great fight.
The resolution was seconded by Alderman Row, who commented:
We have suffered, but we have been victorious, although we have paid a dear price for it.
The resolution was carried in silence, everyone present in the Council Chamber rising in their places.
A memorial service was held at St Saviour's on 13th June, in honour of the fallen, and for Lord Kitchener and the crew of HMS Hampshire, who had died when the ship struck a mine while sailing to Russia. The Mayor attended in civic state, preceded by three macebearers and the Water Bailiff carrying the Silver Oar.
Seats were reserved for the relatives of the fallen and "a considerable number were present in mourning" and black was worn by almost everyone. Reverend F R B Simpson (who had lost his younger brother in France six months earlier) preached a sermon:
God, after all, is our Father, and like a father He desires his children to come nearer to him. Therefore He calls them home; and through this great tribulation of war He is calling home His children in very large numbers. Why? Believe me, it is because He has other work for them to do, and when you and I are occupied in good work, then are we the nearer to those who have given their lives for us.
The service concluded with the Dead March from Saul, and a Bugler from the RN College sounded the Last Post.
Frederick Brewster and Richard Todd were also remembered in the Sunday service at St Thomas of Canterbury, in Kingswear.
The men who survived
Many more men from Dartmouth fought in the battle and survived. We have so far identified that 20 ships included 42 men from the town in their crews at the time of the battle. Research continues to identify others. The men identified so far were:
Battleships
- Samuel Symons Corber, Petty Officer 1st Class
- Alfred Love, Seaman Gunner
- Lt Alexander Percy McMullen, RNVR
- William Thomas Trownson, Boy 1st Class
- George Thomas Wakelin, Officers Chief Cook
- Horace George Ball, Leading Seaman
- John Charles Crook, Able Seaman
- Walter John Hutchings, Leading Stoker
- Percy Veale, Chief Electrical Artificer
- Richard Stanley Martin Pillar, Stoker I
- William Henry Byles, Petty Officer
- Charles Edward Osmond Prowse, Chief Stoker
- Richard Edward Williams, Stoker Petty Officer
- Sydney Hannaford, Chief Stoker
- Frederick John Balkham, Leading Seaman (had previously served in Agincourt) Collingwood
- Joseph Roger Foxworthy Husson, Joiner
- Francis Arthur Kelland Turner, Able Seaman
- Alfred George Gunnell, Leading Signalman (had previously served in Centurion) Conqueror
- Herbert John Chadder, Able Seaman
- William Giles Newman, Boy Telegraphist
- Edwin George Carder, Chief Shipwright
- Charles Ambrose Gunning, Engine Room Artificer
- Andrew James Jarwood, Officer's Steward
Battlecruisers
- Alfred Gee, Carpenter's Mate
- Frederick Thomas Nathaniel Mitchelmore, Engine Room Artificer
- Lt Arthur J R Darby, RNVR (produced the ship's official transmitting station report after the battle)
- Arthur Mills Langley, Stoker I
- John Cecil Pillar, Able Seaman, Torpedoman
- Lt Kenneth G Reid, RNVR
- Alfred J Thorne, Master at Arms
- George de Marche Turner, Leading Stoker
- Sydney Ball Webber, Able Seaman
- Frederick Wotton, Stoker I
- Midshipman Alfred Arthur Noel Gregory
- Timothy Lyons, Leading Seaman
- William George Northcott, Chief Armourer
- Cecil Henry Pascoe, Boy 1st Class
- Philip Ernest Pepperell, Engine Room Artificer
Armoured Cruisers
- Frank Prout Tucker, Able Seaman
- George David Langley, Seaman Gunner
- John Henry Stuckey, Master of Arms
Warrior was heavily damaged in the battle though she was able to withdraw. Engadine took off her surviving crew and she was abandoned the day after, and was subsequently lost.
Light Cruisers
- Richard Ferris Jarwood, Acting Chief Blacksmith
Destroyers
- Frank Herman Burridge
- William Henry Balkham, Stoker I
Sources
The above account draws on the following:
British Battleships of World War One; R A Burt, 1986, publ Pen & Sword Books, 2012
Jutland 1916: Death in the Grey Wastes, Nigel Steel and Peter Hart, 2003, publ Cassell, 2004
The Rules of the Game: Andrew Gordon, 1996, publ Penguin, 2015
A History of the Royal Navy, World War 1: Mike Farquharson-Roberts, 2014, publ I B Tauris & Co, 2014
Maps are taken from the Official History, Naval Operations Volume 3, Spring 1915 to June 1916, Part 2 of 2, by Sir Julian S Corbett, accessed on www.naval-history.net.
Times quoted are those used in the above sources, recognising that the timing of events is itself a matter of controversy, as so much else about the battle is too.